Setup password protected networking in Windows 11
With the latest Windows 11 update Microsoft has tightened security on network file sharing. Unfortunately we will need to change how networking is setup, which will involve the following additions to our current networking process.
On the Host Computer
Create a local user account with username and password
- Go to Settings / Accounts / Other Users
- Click Add account
- Click "I don't have this person's sign-in information"
- Click "Add a user without a Microsoft account"
- For User name, enter "Gym Assistant Host"
- For Password, enter "host"
For all security questions, enter "host" as the answer
- Click Next to finish
Turn OFF Password Protected Sharing
- Go to Settings / Network & internet / Advanced network settings / Advanced sharing settings
- Open All Networks
- Turn OFF Password protected sharing
Get Host computer name
- In Gym Assistant select Help / Troubleshooting / Network Monitor.

- Click Copy Computer Path.
On each Client Computer
Connect to the Host Computer
- Open File Explorer.
- Open Network. NOTE: In the past the host computer would usually appear automatically in Network.
- In the path field, paste the copied path from the Host computer.

- After a few seconds you will see the Enter Network Credentials window:
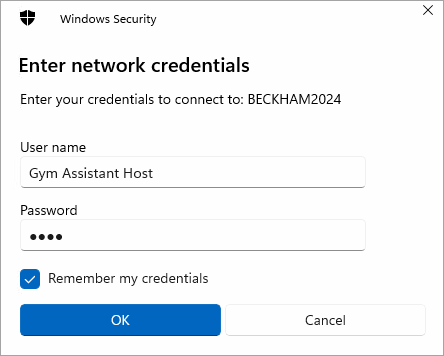
- Enter the User Name "Gym Assistant Host" and Password "host".
- Check Remember my credentials. (Don't forget this step!)
- Click OK.
- In Gym Assistant, now set the data path by copying the path into the Find Data Now window.
Article ID: 59
Created: February 19, 2025
Last Updated: April 22, 2026
Author: Jon Harlan
Online URL: https://gymassistant.phpkb.cloud/article/setup-password-protected-networking-in-windows-11.html